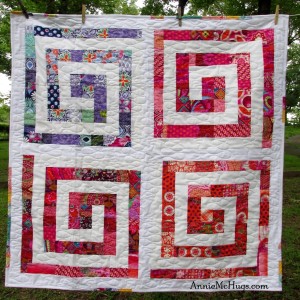
The above picture is the original quilt I made several years ago. Today’s SPIN tutorial is slightly different and a completely different colorway. Are you okay with that? Good! Here we go.
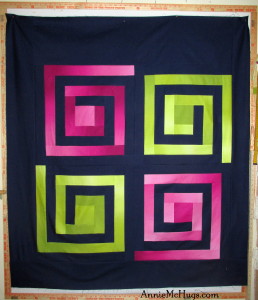
I put this SPIN quilt top together yesterday afternoon while testing my pattern. (We pattern makers do that all the time!) This picture is just the SPIN top. It’s unquilted (saving back and quilting for another day and another post).
BONUS TIP: FYI: My design wall is bordered with yardsticks. It is super handy. I Love handy.
All about SPIN:
Finished size without borders: 40” x 40”. Finished size with borders (for navy SPIN is: 50” x 55”)
Making an all-time favorite block, the log cabin, look and feel modern is easy…super-size it; use solid colors as your background; create high contrast with bright fabrics; and it creates movement and fun. This version is contemporary but can be can be reimagined in many striking color combinations. The icing on the cake is you can use 2 ½ inch scrappy strips make construction so fast and fun!
Materials List
- Top:
- Solid color = 2 yards
- Block One = 3/8 yard
- Block 2 = 3/8 yard
- Block 3 = 3/8 yard
- Block 4 = 3/8 yard
- Backing: TBD yards backing fabric without overage/margins on sides for quilting. Longarm quilting needs overage/margin.
- Batting: TBD yard batting without overage/margins. Longarm quilting needs overage/margin
- Binding: ½ yard for 2.5 inch binding
Fabrics Used
- I used 3 fabrics for this quilt top.
- I used “Ombre” by Vanessa Christenson of V & Co. for Moda.
- The green colorway is called Chartreuse (my personal fav)
- The pink colorway is called Magenta.
- These were in my stash. I’m frugal like that.
- I used a solid navy blue as the background color. Any brand you choose is fine . Why navy? Hmmmm…I love high contrast. I had it in my stash. Navy is a good neutral. I liked it.
- I used “Ombre” by Vanessa Christenson of V & Co. for Moda.
BONUS TIP: The easiest & fastest way to make this block is to use Jelly Roll strips of your favorite fabrics. And a solid background.
Cutting Instructions for the SPIN tutorial
Standard stuff for quilters: Measurements include 1/4″ seam allowances. WOF = width of fabric assuming width of fabric is 42” wide without selvedge. Unfinished block = 20” finished.
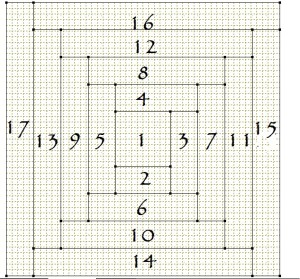
Background fabric (a solid navy in the sample quilt): NOTE: This block has 17 pieces. I’ve numbered the pieces of the block for ease of construction.
- For all four (4) blocks, cut:
- Cut 4 (2 1/2” x 20 1/2”) for block position (#17)
- Cut 4 (2 1/2” x 18 1/2”) for block position (#16)
- Cut 4 (2 1/2” x 16 1/2”) for block position (#14)
- Cut 4 (2 1/2” x 14 1/2”) for block position (#11)
- Cut 4 (2 1/2” x 12 1/2”) for block position (#9)
- Cut 4 (2 1/2” x 10 1/2”) for block position (#8)
- Cut 4 (2 1/2” x 8 1/2”) for block position (#6)
- Cut 4 (2 1/2” x 6 1/2”) for block position (#3)
The following instructions will need to be followed for each of the four blocks.
- Cut 1 (2 1/2” x 18 1/2”) for block position (#15)
- Cut 1 (2 1/2” x 16 1/2”) for block position (#13)
- Cut 1 (2 1/2” x 14 1/2”) for block position (#12)
- Cut 1 (2 1/2” x 12 1/2”) for block position (#10)
- Cut 1 (2 1/2” x 10 1/2”) for block position (#7)
- Cut 1 (2 1/2” x 8 1/2”) for block position (#5)
- Cut 1 (2 1/2” x 6 1/2”) for block position (#4)
- Cut 1 (2 1/2 ‘ x 4 ½) for block position (#2)
- Cut 1 (4 1/2” x 4 1/2”) for block position (#1)
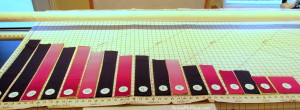
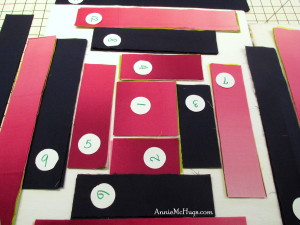
BONUS TIP: As I cut out each block position, I kept them organized by placing in order on a my handy-dandy cardboard mat. I also punched circles out with a scrapbooking punch and numbered them. 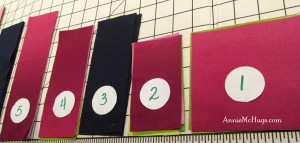
Another BONUS TIP: After everything was cut out, I laid out my pieces in the order of construction…like this:
Construction:
- Stitch the #1 block to the #2 block. Press open. (Seriously, pressing is important.)
- Stitch #3 to #1-2. Following diagram. Press open. (Seriously… important.)
- Stitch #4 to #1-3. I double check the Diagram every single time. Can you guess why? Then, press.
- Stitch #5 to #1-4. See Diagram. See it building?
- Stitch #6 to #1-5. Placement is important….and easy.
- Stitch #7 strip to the group.
- Stitch #8 strip to the side. Always press.
- Stitch #9 strip to the bottom. Press again.
- Stitch #10 strip to the side. (ugh!)
- Stitch #11 strip to the top.
- Stitch #12 strip to the side.
- Stitch #13 strip to the bottom.
- Stitch #14 strip to the side.
- Stitch #15 strip to the top.
- Stitch white #16 strip to the side.
- Stitch white #17 strip to the side.
Another diagram to look at:
Done! Repeat until 4 blocks are completed. You will then have 4 awesome blocks!
Assemble 4 blocks:
- Layout the four blocks in a pleasing order. Look at the pic to see placement.
BORDER OPTIONS: Borders? Yes? No?
- For the original, scrappy quilt with white background, I did not add a border.
- For the navy, chartreuse and magenta quilt I added borders.
Today’s last BONUS TIP: Another technique to add a contemporary look to any quilt is to add borders out of the background fabric in different sizes. Weird, right? But, cool. For this quilt I cut borders like this:
- Top: 10 inch wide top border
- Left: 6 inch wide
- Right: 4 inch wide
- Bottom: 6 inch wide
Finishing Instructions
- Layer the backing, batting, and quilt top. Baste. Quilt as desired. Bind. Label it!
In conclusion, thanks for letting me SHARE the SPIN tutorial. SPIN it however you want it. And, show us what fabulous quilt you create.
May God Bless You,
Annie

Thank you for this fun tutorial. I think I will give it a try with some of my favorite fabrics. You are an artistic angel!!